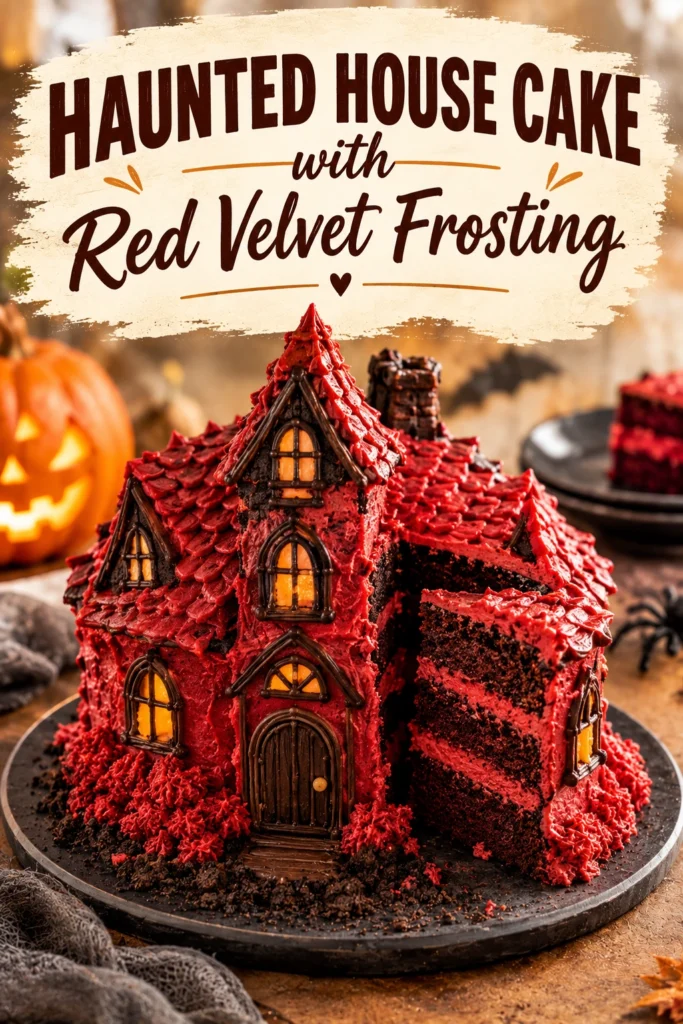
Deep, dark chocolate layers paired with a vivid, crimson frosting create a striking visual contrast that immediately captures attention.
This Haunted House Cake features a moist, structured chocolate base designed to be stacked and carved into a spooky silhouette.
Bakers appreciate this recipe because it balances a sturdy crumb for building with a rich, velvety flavor that doesn’t feel overly sweet.
The unique twist here is the Red Velvet Frosting, which mimics the look of a velvet curtain or spooky accents, providing a tangier profile than standard buttercream.
Unlike store-bought cakes that often rely on heavy preservatives and artificial flavors, this homemade version uses real cocoa and cream cheese for a cleaner, more sophisticated taste.
Anyone looking to impress guests at a Halloween gathering or a themed dinner party will find this cake to be an ideal centerpiece.
Follow the guide below to master the baking and assembling process.
- ●Why You’ll Love This Recipe
- ●A Brief Background / Why This Recipe Works
- ●Perfect For Spooky Halloween Celebrations
- ●Main Ingredient Spotlight: Dutch Process Cocoa
- ●Secondary Ingredient Spotlight: Cream Cheese
- ●Key Ingredients
- ●How to Make It
- ●Pro Tips
- ●Delicious Variations
- ●Best Ways to Serve
- ●Storage and Leftovers
- ●Frequently Asked Questions
- ●Why This Recipe Belongs in Your Weekly Rotation
- ●Final Thoughts
This cake transforms a standard dessert into a piece of edible art that tastes as good as it looks.
- ●The striking color contrast between the dark cake and red frosting is visually captivating.
- ●A sturdy crumb makes carving the house shape much easier than with a soft sponge.
- ●Red velvet frosting adds a slight tang that cuts through the richness of the chocolate.
- ●The recipe is scalable for different house sizes depending on the number of guests.
- ●It provides a creative activity for families to decorate together.
- ●The chocolate flavor is deep and earthy, avoiding the sugary taste of boxed mixes.
- ●It pairs beautifully with a variety of spooky decorations like chocolate shards or gummy worms.
- ●The moist texture ensures the cake remains fresh even after being carved.
Whether you are a seasoned baker or a novice, the results are consistently impressive and crowd-pleasing.
A Brief Background / Why This Recipe Works |
The success of a themed cake depends on the structural integrity of the sponge. A standard chocolate cake can often be too fragile to stack high, but this version uses a specific ratio of fats and flour to ensure the layers can support the weight of the “roof” and frosting.
The use of Red Velvet Frosting is a strategic choice. Traditional red velvet cake often tastes like mild chocolate, but flavors and colors into the frosting, the dessert achieves a more intense flavor profile. This combination evokes the mood of a gothic manor while remaining delicious.
This structural and flavor balance makes it a reliable choice for high-stakes holiday baking.
Perfect For Spooky Halloween Celebrations |
This cake is a natural fit for October gatherings where the goal is to blend horror and indulgence. Its imposing shape makes it the focal point of any dessert table, drawing guests in with its architectural design.
For those hosting themed dinner parties, this recipe works well because it can be prepared in stages, reducing stress on the day of the event. The layers can be baked and chilled ahead of time, allowing the baker to focus entirely on the artistic assembly.
It also serves as a fantastic alternative to standard cupcakes when you want something more substantial. If you enjoy other themed treats, you might also like the Irresistible Black Velvet Halloween Cake Recipe To Impress Spooky Dessert Idea for an even darker aesthetic.
Main Ingredient Spotlight: Dutch Process Cocoa |
Dutch process cocoa is essential for this recipe because it undergoes a process that neutralizes the natural acidity of the cocoa bean. This results in a darker color and a smoother, more mellow chocolate flavor compared to natural cocoa powder.
In terms of texture, it integrates seamlessly into the batter, providing a consistent crumb that is neither too gritty nor too airy. This density is what allows the cake to be carved into the house shape without crumbling excessively.
Secondary Ingredient Spotlight: Cream Cheese |
Cream cheese provides the necessary body and tang for the frosting. While butter-based frostings can be overly sweet and prone to melting, cream cheese adds a professional stability and a sophisticated flavor profile.
The high fat content in cream cheese helps the red food coloring distribute evenly, preventing streaks and ensuring a vibrant, consistent crimson hue across the entire cake.
When combined with powdered sugar, it creates a medium that is pipeable yet spreads smoothly, making it ideal for the detailed work required for a haunted house theme.
Key Ingredients |
Each component plays a specific role in ensuring the cake is both visually striking and delicious.
- ●Dutch process cocoa — provides the deep chocolate color and earthy flavor.
- ●Cake flour — creates a finer crumb for a more professional texture.
- ●Buttermilk — adds moisture and activates the leavening agents.
- ●Cream cheese — forms the tangy, stable base of the frosting.
- ●Unsalted butter — adds richness to both the sponge and the icing.
- ●Red food coloring — gives the frosting its signature spooky crimson look.
- ●Vanilla extract — enhances the chocolate and cream notes.
- ●Baking soda — helps the cake rise and interact with the cocoa.
How to Make It |
Creating a haunted house cake requires a bit of patience and a steady hand during the carving process.
- Prepare the pans: Grease three 8-inch round cake pans and line the bottoms with parchment paper. This step is vital because chocolate cakes can be sticky, and the parchment ensures a clean release to avoid tearing the layers.
- Mix dry ingredients: Sift together the flour, cocoa powder, baking soda, and salt into a large bowl. Sifting removes clumps of cocoa, which would otherwise create unsightly white or brown spots in the finished cake.
- Blend wet ingredients: Whisk the sugar, oil, eggs, and vanilla until the mixture is smooth and slightly pale. Avoid over-beating the eggs, as too much air can cause the cake to rise and then collapse in the center.
- Combine and bake: Gradually stir the dry ingredients into the wet mixture, alternating with the buttermilk. Bake at 350°F until a toothpick inserted in the center comes out clean, but do not overbake, or the cake will become too dry to carve.
- Cool and level: Let the cakes cool completely in the pans before transferring them to a wire rack. Use a serrated knife to slice off the domed tops of the cakes so they are perfectly flat, which prevents the house from leaning.
- Whip the frosting: Beat the softened cream cheese and butter together until fluffy, then slowly add powdered sugar and red food coloring. Ensure the frosting is smooth and free of lumps before you begin piping, as lumps are very visible on a flat surface.
- Assemble the house: Stack two layers with frosting in between, and carve the third layer into a triangle for the roof. Apply a thin crumb coat of frosting over the entire structure and chill for 30 minutes to lock in the crumbs.
- Final decorating: Apply the final layer of red velvet frosting, using a piping bag to create “dripping blood” effects or window frames. Be careful not to apply too much pressure, or the frosting may slide off the slanted roof.
1Small adjustments in technique can make a significant difference in the final presentation.
- ●2Chill before carving: Place the cake layers in the freezer for 20 minutes before cutting them into shapes to minimize crumbs.
- ●3Use gel colors: Opt for gel-based red food coloring instead of liquid to achieve a deep crimson without thinning the frosting.
- ●4Sift your cocoa: Always sift cocoa powder twice to ensure there are no bitter clumps of powder in the batter.
- ●5Room temperature ingredients: Ensure butter and cream cheese are truly softened to avoid streaks of unmixed fat in the frosting.
- ●6Stabilize the roof: Use a wooden skewer or a straw to pin the triangular roof to the base layers for extra security.
Delicious Variations |
You can easily adapt this recipe to suit different taste preferences or dietary needs.
- ●White Chocolate Twist: Replace the cocoa powder with more flour and add white chocolate chips for a ghostly white house.
- ●Orange Accents: Use orange frosting for the windows to create a classic Halloween pumpkin-colored glow.
- ●Gluten-Free Option: Swap the cake flour for a high-quality 1:1 gluten-free baking blend.
- ●Espresso Infusion: Add a teaspoon of instant espresso powder to the batter to intensify the chocolate flavor.
- ●Fruit Filling: Add a layer of raspberry jam between the cake layers for an extra burst of tartness.
These tweaks allow you to customize the cake for different events, such as a more traditional Indulge In Christmas Red Velvet Cheesecake Delight during the winter season.
Best Ways to Serve |
Presentation is everything when serving a themed dessert like this.
- ●Place the cake on a black cake board or a platter covered in crushed Oreo cookies to mimic dirt.
- ●Add plastic spiders or gummy worms around the base of the house for added creepiness.
- ●Serve with a side of fresh raspberries to complement the red velvet frosting.
- ●Pair the slices with a warm cup of coffee or a cold glass of milk.
When slicing, use a hot knife dipped in warm water and wiped clean between each cut. This ensures the red frosting doesn’t smear into the dark chocolate cake, keeping the layers distinct and sharp.
For a party setting, pre-slice the cake into rectangles before the guests arrive so the “house” structure is preserved for photos but easy to distribute.
Storage and Leftovers |
Refrigerating
Keep the cake in an airtight container in the refrigerator for up to 5 days. Because of the cream cheese in the frosting, refrigeration is mandatory to prevent spoilage.
Reheating
Do not reheat the cake as a whole. Instead, allow individual slices to sit at room temperature for 30 to 60 minutes before eating to restore the softness of the butter and frosting.
Freezing
Unfrosted layers can be wrapped tightly in plastic wrap and foil for up to 3 months. If freezing the fully decorated cake, freeze it for 2 hours first, then wrap it carefully; thaw in the fridge overnight before serving.
Frequently Asked Questions |
- ●Q: Why is my frosting too runny to hold the house shape?A: This usually happens if the butter or cream cheese was too warm when mixing, or if too much liquid food coloring was used. To fix it, chill the frosting in the fridge for 15 minutes and then whip it again briefly to regain the necessary stiffness.
- ●Q: Can I use natural cocoa powder instead of Dutch process?A: You can, but the cake will be lighter in color and have a more acidic taste. If you switch, you may need to add a tiny pinch more baking soda to neutralize the extra acid and maintain the rise of the cake.
- ●Q: How do I stop the roof from sliding off the cake?A: The best method is to use a small amount of frosting as “glue” and then insert a wooden skewer or a plastic straw vertically through the roof and into the bottom layer. This provides a mechanical anchor that holds the weight.
- ●Q: Is it possible to make this cake without food coloring?A: Yes, you can use a concentrated beet powder or a small amount of pure red beet juice. Keep in mind that the color will be more of a muted burgundy than a bright crimson, and the flavor may be slightly earthier.
- ●Q: My cake is crumbling too much while I carve it, what happened?A: This often occurs if the cake is too warm or if it was overbaked. For the best results, always chill the layers in the freezer for a short period before carving and use a very sharp serrated knife.
Why This Recipe Belongs in Your Weekly Rotation |
While a haunted house cake is a specialty item, the core chocolate sponge and red velvet frosting are versatile enough for any occasion. The balance of deep chocolate and tangy cream cheese is a timeless combination that appeals to both children and adults.
Integrating this into your baking repertoire means you have a reliable, sturdy cake base that can be adapted for birthdays, holidays, or simple weekend treats. Once you master the carving and frosting techniques, you can apply them to any themed cake project.
The process of making this cake is as much about the experience as it is about the taste, making it a rewarding project for any home baker.
Final Thoughts |
This Haunted House Cake combines a rich, dark chocolate base with the bold, tangy flavor of red velvet frosting to create a dessert that is as visually striking as it is delicious.
It is an excellent choice for those who want to move beyond simple desserts and create something that doubles as a party centerpiece while maintaining a professional flavor profile.
Grab your mixing bowls and get ready to build a spooky, delicious masterpiece for your next gathering.

Haunted House Cake with Red Velvet Frosting
- Prep Time: 45 minutes
- Cook Time: 35 minutes
- Total Time: 1 hour 20 minutes
- Yield: 12 servings 1x
- Category: Dessert
- Method: Baking
- Cuisine: American
Description
A structurally sound dark chocolate cake carved into a spooky house shape and covered in a vibrant, tangy red velvet cream cheese frosting.
Ingredients
- 2 cups cake flour
- 3/4 cup Dutch process cocoa powder
- 2 cups granulated sugar
- 1 1/2 tsp baking soda
- 1/2 tsp salt
- 2 large eggs
- 1 cup buttermilk
- 1/2 cup vegetable oil
- 2 tsp vanilla extract
- 8 oz softened cream cheese
- 1/2 cup softened unsalted butter
- 4 cups powdered sugar
- 1 tsp vanilla extract
- Red gel food coloring
Instructions
- Preheat your oven to 350°F and grease three 8-inch round cake pans, lining the bottoms with parchment paper.
- Sift together cake flour, cocoa powder, baking soda, and salt in a large bowl.
- In a separate bowl, whisk together sugar, oil, eggs, and vanilla until smooth.
- Alternately add the dry ingredients and buttermilk to the wet mixture, stirring until just combined.
- Divide the batter evenly between the pans and bake for 30-35 minutes or until a toothpick comes out clean.
- Cool cakes completely, then trim the tops with a serrated knife to ensure they are flat.
- Beat softened cream cheese and butter together until fluffy, then gradually add powdered sugar and vanilla.
- Stir in red gel food coloring until a deep crimson hue is achieved.
- Stack two layers with frosting in between. Carve the third layer into a triangle and place it on top as a roof.
- Apply a thin crumb coat of frosting and chill for 30 minutes.
- Cover the cake with the remaining red frosting, piping details for windows and doors.