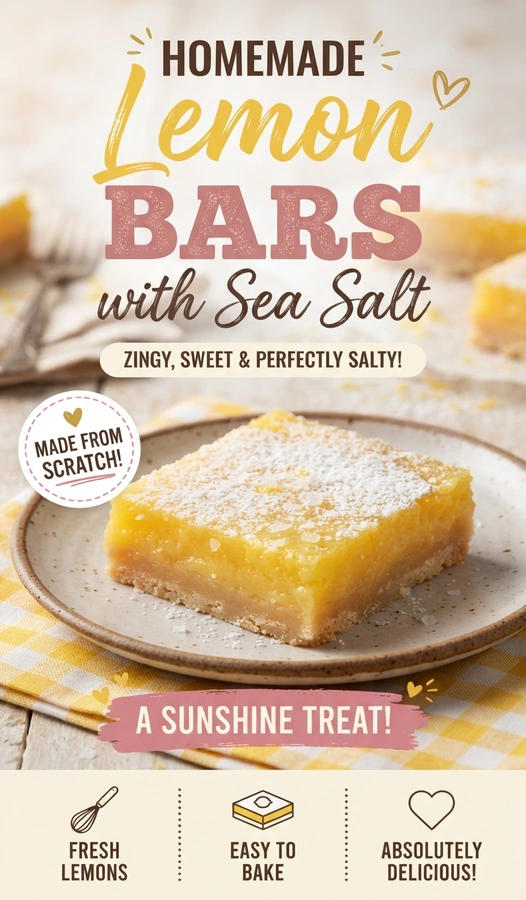
A fine sprinkle of flaky sea salt catches the light on top of a bright yellow, translucent citrus layer.
These lemon bars feature a dense shortbread base topped with a concentrated lemon custard. The addition of salt cuts through the sugar and heightens the natural acidity of the fruit.
Many people prefer this version over store-bought options because the curd is thicker and the citrus flavor is more authentic.
The recipe replaces the standard overly sweet profile with a balanced tang that lingers on the palate.
It suits anyone who enjoys a sharp contrast between sweet and savory in their desserts.
If you enjoy other bright flavors, you might also like Fluffy Lemon Ricotta Pancakes Light Delicious for breakfast.
Follow the guide below to achieve a clean cut and a stable custard layer.
- ●Why You’ll Love This Recipe
- ●A Brief Background on Why This Recipe Works
- ●Perfect For Spring Gatherings and Tea Time
- ●Main Ingredient Spotlight: Fresh Lemons
- ●Secondary Ingredient Spotlight: Flaky Sea Salt
- ●Key Ingredients
- ●How to Make It
- ●Pro Tips
- ●Flavor Variations
- ●Best Ways to Serve
- ●Storage and Leftovers
- ●Frequently Asked Questions
- ●Why This Recipe Belongs in Your Weekly Rotation
- ●Final Thoughts
This dessert balances intensity and subtlety, making it a versatile addition to any dessert platter.
- ●The shortbread base provides a sturdy, buttery foundation.
- ●Fresh lemon juice creates a sharp, authentic tartness.
- ●Sea salt prevents the custard from tasting one-dimensional.
- ●The texture is a mix of crumbly crust and smooth curd.
- ●It requires only a few pantry staples.
- ●The bright yellow color looks professional on a serving plate.
- ●It can be made in a single baking pan.
- ●The flavor profile is sophisticated enough for adult guests.
- ●It pairs well with both coffee and tea.
- ●The bars hold their shape well when sliced.
These steps result in a treat that feels refined without requiring professional pastry equipment.
A Brief Background on Why This Recipe Works |
The success of a lemon bar depends on the ratio of fat to acid. The butter in the crust creates a barrier that prevents the lemon filling from soaking into the dough, which keeps the base crisp.
The filling relies on eggs for structure. As the eggs cook in the oven, they thicken the lemon juice and sugar into a stable curd that does not run when sliced.
Adding sea salt at the end is a strategic choice. Salt suppresses the perception of bitterness and enhances the sweetness, making the lemon flavor taste more vivid.
This combination of textures and tastes creates a cohesive dessert that satisfies multiple cravings at once.
Perfect For Spring Gatherings and Tea Time |
These bars are ideal for brunch or afternoon tea due to their bright, uplifting flavor. They provide a refreshing contrast to heavier pastries or savory brunch dishes.
For holidays like Easter or Mother’s Day, they serve as a visually appealing platter addition. The clean lines and vibrant color fit the seasonal aesthetic.
Because they are stable at room temperature for several hours, they are useful for potlucks or picnics. They transport easily without the need for constant refrigeration until the moment of serving.
Main Ingredient Spotlight: Fresh Lemons |
Fresh lemons provide the essential acidity and aromatic oils that define the dish. Using bottled juice lacks the depth and brightness of fresh-squeezed citrus.
The zest contains concentrated oils that provide the “lemon” scent and flavor, while the juice provides the tartness. Together, they create a layered citrus experience that feels fresh and natural.
Secondary Ingredient Spotlight: Flaky Sea Salt |
Flaky sea salt is used as a finishing touch rather than a mixing ingredient. Its large crystals provide a momentary burst of saltiness that contrasts with the smooth custard.
Unlike table salt, which disappears into the dish, flaky salt remains on the surface. This ensures that each bite has a varying level of salinity, which keeps the palate engaged.
Key Ingredients |
Gather these components to ensure the correct texture and flavor balance.
- ●All-purpose flour — Provides the structure for the shortbread crust.
- ●Unsalted butter — Adds richness and a tender crumb to the base.
- ●Granulated sugar — Sweetens both the crust and the lemon filling.
- ●Fresh lemons — Used for both the zest and the juice to provide tartness.
- ●Eggs — Acts as the thickening agent for the lemon curd.
- ●Flaky sea salt — Adds a savory contrast to the citrus sweetness.
How to Make It |
Prepare your workspace and preheat your oven to ensure the crust bakes evenly.
- Prepare the pan: Line a square baking pan with parchment paper, leaving an overhang on the sides. This allows you to lift the entire block of bars out for cleaner slicing later.
- Mix the crust: Combine flour, sugar, and melted butter in a bowl until the mixture resembles wet sand. Press the dough firmly into the bottom of the pan using a flat-bottomed glass to ensure there are no air pockets.
- Bake the base: Bake the crust until the edges are just starting to turn golden brown. Do not overbake, or the crust will become too hard and lose its buttery quality.
- Whisk the filling: Beat eggs and sugar together until smooth, then stir in the lemon juice and zest. Whisk until the mixture is uniform and no sugar granules remain.
- Bake the curd: Pour the filling over the hot crust and return the pan to the oven. Bake until the center is set and no longer jiggles when the pan is gently shaken.
- Cool and set: Let the bars cool completely in the pan before moving them to the refrigerator. This setting period is necessary to ensure the curd reaches the correct consistency.
- Finish and slice: Lift the bars out using the parchment paper and cut them into squares with a hot knife. Sprinkle the top of each bar with a pinch of flaky sea salt immediately before serving.
1Use these techniques to avoid common baking pitfalls and improve the final result.
- ●2Room temperature eggs: Use eggs that have sat out for 30 minutes to ensure the filling emulsifies without clumping.
- ●3Zest before juicing: Always remove the yellow zest from the lemons before cutting them in half for juicing, as it is nearly impossible to zest a squeezed lemon.
- ●4Avoid over-mixing: Stir the crust ingredients just until combined to prevent the gluten from developing, which keeps the base tender.
- ●5Hot knife technique: Dip your knife in hot water and wipe it dry between every single cut to get perfectly sharp edges on each bar.
- ●6Avoid over-baking: Remove the bars when the center still has a very slight wobble; the residual heat will finish the cooking process.
Flavor Variations |
Modify the basic recipe to suit different tastes or seasonal availability.
- ●Raspberry swirl: Drop small dots of raspberry jam onto the curd and swirl with a toothpick before baking.
- ●Coconut crust: Replace a small portion of the flour with shredded coconut for a tropical twist.
- ●Lime infusion: Use a mix of lemon and lime juice for a more complex, zesty acidity.
- ●Almond base: Add a drop of almond extract to the crust for a nutty undertone.
- ●Powdered sugar dust: For those who prefer more sweetness, add a light dusting of powdered sugar under the salt.
These adjustments allow you to tailor the acidity and sweetness to your preference.
Best Ways to Serve |
Presentation enhances the experience of these vibrant citrus squares.
- ●Serve on a white ceramic platter to make the yellow color pop.
- ●Accompany with a dollop of unsweetened whipped cream to mellow the tartness.
- ●Pair with fresh blueberries or raspberries on the side for added color and freshness.
- ●Serve alongside a cup of Earl Grey tea, which complements the citrus notes.
For a more formal presentation, dust the plate with a bit of lemon zest. This reinforces the aroma as the guest brings the dessert toward them.
If serving as part of a larger spread, place the bars next to other citrus-based items. For a savory contrast, consider serving them after a meal featuring Refreshing Lemon Basil Parmesan Pasta Salad Recipe
Storage and Leftovers |
Refrigerating
Store the bars in an airtight container in the refrigerator for up to 5 days. Keep them chilled to maintain the structure of the curd.
Reheating
These bars are designed to be eaten cold or at room temperature. Do not reheat them in the oven or microwave, as the curd may break or melt.
Freezing
Wrap individual bars in plastic wrap and place them in a freezer bag for up to 3 months. Thaw them in the refrigerator overnight before eating.
Frequently Asked Questions |
- ●Q: Why did my lemon bars crack on top?A: Cracking usually occurs when the bars are overbaked or cooled too quickly in a cold environment. Ensure you remove the pan from the oven as soon as the center is set and let them cool slowly at room temperature before refrigerating.
- ●Q: Can I use a food processor for the crust?A: Yes, a food processor works well for the crust. Pulse the flour and sugar first, then add the melted butter and pulse until the mixture looks like coarse crumbs, taking care not to over-process into a paste.
- ●Q: Why is my crust soggy?A: A soggy crust often happens if the filling is poured onto an underbaked base or if the bars are stored in the fridge for too long without a proper seal. Ensure the crust is golden and the bars are stored in an airtight container.
- ●Q: Can I use bottled lemon juice instead of fresh?A: While bottled juice is possible, it lacks the bright, aromatic quality of fresh lemons. Bottled juices often have a metallic or overly acidic taste that cannot be balanced effectively as fresh citrus.
- ●Q: How do I prevent the curd from sticking to the knife?A: The most effective method is to use a sharp knife dipped in hot water. The heat helps the blade slice through the dense curd cleanly without pulling or tearing the top layer of the bar.
Why This Recipe Belongs in Your Weekly Rotation |
Adding a reliable citrus dessert to your repertoire provides a light option for those who find traditional cakes too heavy. These bars offer a concentrated burst of flavor that satisfies a craving for sweets without being cloying.
The preparation process is straightforward and uses ingredients likely already in your kitchen. Because they store so well, you can bake a batch on Sunday and have a treat ready for the entire week.
Whether you need a quick gift for a neighbor or a refreshing end to a family dinner, these bars deliver a consistent and sophisticated result every time.
Final Thoughts |
These lemon bars with sea salt combine a buttery shortbread base with a sharp, creamy citrus topping. The addition of salt creates a balanced profile that appeals to a wide range of tastes.
Making these at home allows you to control the quality of the ingredients and the level of tartness. It is a simple way to bring a professional-quality dessert to your kitchen.
Gather your lemons and start baking to enjoy this vibrant contrast of flavors today.

Lemon Bars with Sea Salt
- Prep Time: 20 minutes
- Cook Time: 45 minutes
- Total Time: 1 hour 5 minutes
- Yield: 16 bars 1x
- Category: Dessert
- Method: Baking
- Cuisine: American
Description
Tart and creamy lemon curd on a buttery shortbread crust, finished with flaky sea salt to balance the sweetness.
Ingredients
- 1 cup all-purpose flour
- 1/2 cup powdered sugar
- 1/2 cup unsalted butter, melted
- 2 cups granulated sugar
- 4 large eggs
- 1/2 cup fresh lemon juice
- 2 tablespoons lemon zest
- 1 teaspoon vanilla extract
- Flaky sea salt for garnish
Instructions
- Preheat oven to 350°F (175°C) and line an 8×8 inch baking pan with parchment paper.
- Mix 1 cup flour, 1/2 cup powdered sugar, and 1/2 cup melted butter until crumbly.
- Press the mixture firmly into the pan and bake for 20 minutes until light golden.
- In a bowl, whisk 2 cups granulated sugar, 4 eggs, 1/2 cup lemon juice, lemon zest, and vanilla until smooth.
- Pour the lemon mixture over the baked crust.
- Bake for 20-25 minutes until the filling is set and no longer jiggles in the center.
- Cool completely in the pan, then refrigerate for 2 hours.
- Lift out with parchment, slice into squares, and sprinkle with flaky sea salt.