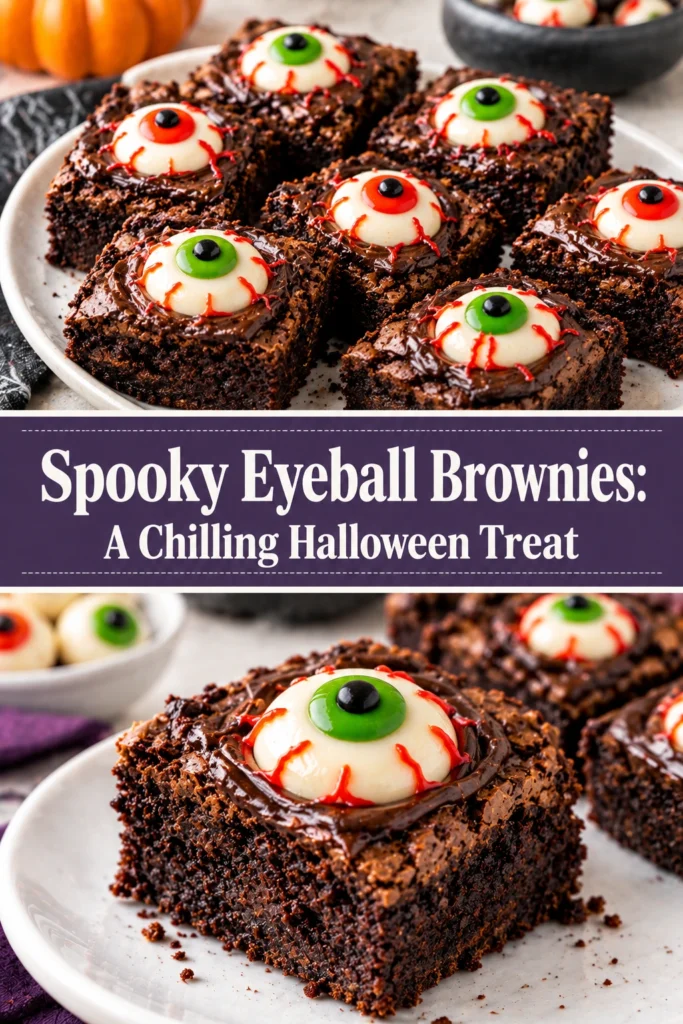
A glossy, dark chocolate surface makes the stark white of the candy eyes pop with an unsettling clarity. These brownies offer a heavy, fudge-like texture that contrasts with the slight crunch of the sugar decorations.
This recipe transforms a standard chocolate bake into a visual centerpiece for a themed party. It focuses on a dense, moist crumb that supports the weight of the toppings without crumbling.
Readers appreciate the simplicity of the prep combined with the high visual impact. It avoids complex sculpting, relying instead on strategic placement of candy for the effect.
Unlike store-bought brownies that often taste airy or overly sweet, these are deep and cocoa-forward. The homemade batter provides a richness that balances the sugar from the candy eyes.
This treat is ideal for parents hosting school parties or anyone wanting a dessert that doubles as decor. It pairs well with other themed bakes like Delectable Witch Finger Cookies A Spooky Halloween Treat Easy Halloween Cookies
Follow the steps below to create a batch of these chilling treats.
- ●Why You’ll Love This Recipe
- ●A Brief Background / Why This Recipe Works
- ●Perfect For Halloween Parties and Spooky Gatherings
- ●Main Ingredient Spotlight: Cocoa Powder
- ●Secondary Ingredient Spotlight: Candy Eyeballs
- ●Key Ingredients
- ●How to Make It
- ●Pro Tips
- ●Delicious Variations
- ●Best Ways to Serve
- ●Storage and Leftovers
- ●Frequently Asked Questions
- ●Why This Recipe Belongs in Your Weekly Rotation
- ●Final Thoughts
These brownies balance a sophisticated chocolate profile with a playful, eerie aesthetic that captures the spirit of the season.
- ●Dense, fudgy consistency that avoids the cakey texture of box mixes.
- ●Visual appeal that requires minimal artistic skill to achieve.
- ●Quick prep time using standard pantry staples.
- ●Deep chocolate flavor that satisfies intense cravings.
- ●Consistent results across different oven types.
- ●Adaptable base that works with various types of chocolate.
- ●Kid-friendly assembly process for a family activity.
- ●Impressive presentation for guests without hours of labor.
The combination of rich cocoa and whimsical toppings makes this a reliable choice for any October celebration.
A Brief Background / Why This Recipe Works |
The success of this recipe lies in the ratio of fat to flour. flour content low and the butter and chocolate high, the brownies maintain a tacky, fudge-like quality that mimics the look of something organic and slightly unsettling.
The use of melted butter creates a smooth emulsion with the sugar, resulting in that characteristic crackly top. This surface provides the perfect stable base for pressing in the candy decorations without them sinking into the batter.
Using a high-quality cocoa powder adds a layer of bitterness that prevents the dessert from becoming cloying, especially when paired with sugary candy eyes.
Perfect For Halloween Parties and Spooky Gatherings |
These brownies are designed for high-traffic events where guests want a hand-held treat. The square cuts make them easy to distribute on a platter without needing plates or cutlery.
They work exceptionally well as part of a dessert spread alongside The Best Halloween Oreo Brownies Recipe For Spooky Fun Easy Halloween Treats Oreo Dessert for a cohesive chocolate theme.
For those preparing for a large crowd, the batter can be made in advance and baked fresh on the day of the party to maintain the best texture.
Main Ingredient Spotlight: Cocoa Powder |
Cocoa powder provides the structural color and the primary flavor profile. Unlike melted chocolate alone, cocoa powder offers a more concentrated, intense chocolate hit that creates the dark, void-like background necessary for the eyeball effect.
It absorbs moisture from the fats in the recipe, helping the brownies set into a dense block rather than a spongy cake. This density is what gives the dessert its satisfying, chewy mouthfeel.
Secondary Ingredient Spotlight: Candy Eyeballs |
Candy eyeballs serve as the focal point of the dish. These sugar-based decorations stay intact during the cooling process, providing a sharp contrast against the dark chocolate.
The varying sizes of candy eyes can be used to create a sense of depth and chaos on the brownie surface. When placed slightly off-center, they create a more realistic and unsettling appearance.
Key Ingredients |
Each component is chosen to build a rich, stable chocolate base that complements the toppings.
- ●Unsalted Butter — adds richness and creates the smooth, fudgy texture.
- ●Granulated Sugar — provides sweetness and helps form the thin, crackly top crust.
- ●Eggs — act as the binding agent to hold the structure together.
- ●Cocoa Powder — delivers the deep chocolate color and bitter flavor notes.
- ●All-Purpose Flour — provides just enough structure to keep the brownies from collapsing.
- ●Vanilla Extract — enhances the chocolate profile and adds aromatic depth.
- ●Candy Eyeballs — provides the essential spooky visual element.
How to Make It |
The process focuses on avoiding over-mixing to ensure the brownies stay dense and fudgy.
- Melt the butter: Heat the butter in a microwave-safe bowl or on the stove until liquid. Do not let it boil, as excess heat can scramble the eggs in the next step.
- Combine sugar and butter: Stir the granulated sugar into the melted butter. The mixture will look grainy at first; this is normal and will dissolve during baking.
- Whisk in wet ingredients: Add the eggs and vanilla extract, stirring until the batter looks glossy. The scent of vanilla will begin to bloom as it mixes with the warm butter.
- Sift in dry ingredients: Fold in the cocoa powder and flour using a spatula. Stop mixing the moment the streaks of flour disappear to avoid introducing too much air, which would make the brownies cakey.
- Prepare the pan: Pour the batter into a lined square baking pan. Use a spatula to smooth the top into an even layer, ensuring no thick spots remain.
- Bake the base: Place the pan in the center of the oven. Bake until the edges are set but the center still has a slight wobble. Overbaking will dry out the fudge center.
- Add the eyeballs: Remove the pan from the oven and immediately press the candy eyeballs into the warm surface. Pressing them in while the chocolate is hot helps them adhere and slightly sink, looking more natural.
- Cool and slice: Let the brownies cool completely in the pan for at least two hours. Slicing too early will cause the brownies to tear and the eyeballs to shift.
1Small adjustments in technique can significantly improve the final texture and look.
- ●2Use parchment paper: Line the pan with parchment that hangs over the edges to lift the entire block out for cleaner cuts.
- ●3Avoid over-mixing: Use a rubber spatula instead of a whisk for the flour to keep the brownies dense.
- ●4Chill before cutting: Place the cooled brownies in the fridge for 30 minutes before slicing for perfectly sharp edges.
- ●5Use a hot knife: Dip your knife in hot water and wipe it dry between every cut to prevent the chocolate from sticking.
- ●6Quality cocoa: Use Dutch-processed cocoa for a darker color and a smoother, less acidic taste.
Delicious Variations |
You can tweak the base to suit different taste preferences or dietary needs.
- ●White Chocolate Swirl: Melt white chocolate and swirl it into the batter before baking for a marbled, “veiny” look.
- ●Peanut Butter Center: Add a dollop of peanut butter under the candy eye for a salty-sweet surprise.
- ●Gluten-Free: Swap all-purpose flour for a 1:1 gluten-free baking blend.
- ●Espresso Boost: Add a teaspoon of instant espresso powder to the cocoa to intensify the chocolate flavor.
- ●Nutty Crunch: Fold in chopped walnuts or pecans for added texture.
These variations allow you to customize the intensity of the flavor while keeping the spooky theme intact.
Best Ways to Serve |
Presentation is key for Halloween treats. These brownies are best served at room temperature to maintain their fudgy consistency.
- ●Platter Arrangement: Arrange them in a circle on a black platter with red berries in the gaps to look like blood.
- ●Individual Servings: Place each square in a small cupcake liner for easy grabbing at a party.
- ●Dessert Board: Pair them with Irresistible Halloween Snack Mix A Spooky Treat Recipe Easy Halloween Party Food and sliced apples.
To elevate the experience, serve these with a glass of cold milk or a dark roast coffee. The bitterness of the coffee cuts through the richness of the fudge.
For a more dramatic effect, use a drizzle of red raspberry sauce across the platter to enhance the macabre theme.
Storage and Leftovers |
Refrigerating
Store the brownies in an airtight container in the fridge for up to 5 days. This keeps them extra fudgy and prevents the candy eyes from softening.
Reheating
Avoid the microwave as it can melt the candy eyes. Instead, let them sit at room temperature for 20 minutes to regain their soft texture.
Freezing
Wrap individual squares in plastic wrap and place them in a freezer bag for up to 3 months. Thaw in the refrigerator overnight before serving.
Frequently Asked Questions |
- ●Q: Why are my brownies cakey instead of fudgy?A: This usually happens due to over-mixing the batter or over-baking. When you mix flour too much, you develop gluten and incorporate air, which creates a cake-like lift. To avoid this, stir the flour in just until combined and remove them from the oven while the center is still slightly soft.
- ●Q: Can I use melted chocolate bars instead of cocoa powder?A: Yes, you can, but the texture will change. Melted chocolate increases the fat content and creates a denser, truffle-like brownie. If you make this swap, reduce the amount of butter slightly to ensure the brownies do not become too greasy or fail to set.
- ●Q: Do the candy eyes melt in the oven?A: In this recipe, the eyes are added after the brownies come out of the oven. If you add them before baking, the sugar will melt and the colors will bleed. Adding them to the hot surface allows them to stick without losing their shape or detail.
- ●Q: How do I get clean cuts without smudging the chocolate?A: The best method is to chill the brownies first. Cold chocolate is firmer and less likely to cling to the blade. Using a sharp chef’s knife and wiping it clean with a damp cloth between every single cut prevents the fudgy residue from building up.
- ●Q: Can I make these without eggs?A: You can use a flax egg or applesauce as a replacement, but the structure will be softer. Because these brownies support candy toppings, a traditional egg is recommended for the necessary stability. If using a substitute, allow them to cool for longer before slicing.
Why This Recipe Belongs in Your Weekly Rotation |
While primarily a holiday treat, the base of these brownies is a timeless classic. The rich, chocolatey profile is a crowd-pleaser that works for any occasion, regardless of whether you include the spooky toppings.
Having a reliable, fudge-style brownie recipe saves time when you need a quick dessert for guests. The simplicity of the ingredients means you likely already have everything in your pantry, reducing the need for special shopping trips.
It provides a creative outlet for baking that results in a professional-looking product. Once you master the fudgy texture, you can adapt the decorations for any season or celebration.
Final Thoughts |
These Eyeball Brownies combine a deep, decadent chocolate base with a playful visual twist. They are designed to be rich, moist, and striking, making them a standout addition to any October dessert table.
You should make these because they offer a high reward for very little effort. They satisfy the craving for a heavy chocolate treat while providing the entertainment value required for a themed party.
Grab your cocoa powder and candy eyes to bring this chillingly delicious treat to your kitchen today.

Spooky Eyeball Brownies: A Chilling Halloween Treat
- Prep Time: 15 minutes
- Cook Time: 25 minutes
- Total Time: 40 minutes
- Yield: 16 brownies 1x
- Category: Dessert
- Method: Baking
- Cuisine: American
Description
Rich and fudgy chocolate brownies topped with candy eyeballs for a spooky, visually striking Halloween dessert.
Ingredients
- 1/2 cup unsalted butter, melted
- 1 cup granulated sugar
- 2 large eggs
- 1 teaspoon vanilla extract
- 1/3 cup unsweetened cocoa powder
- 1/2 cup all-purpose flour
- 1/4 teaspoon salt
- 24–32 candy eyeballs
Instructions
- Preheat your oven to 350°F (175°C) and line an 8×8 inch baking pan with parchment paper.
- Stir melted butter and sugar together in a medium bowl until combined.
- Beat in the eggs and vanilla extract until the mixture is smooth and glossy.
- Sift in the cocoa powder, flour, and salt. Fold gently with a spatula until just combined; do not overmix.
- Spread the batter evenly into the prepared baking pan.
- Bake for 20-25 minutes, or until the edges are firm but the center still has a slight wobble.
- Remove from the oven and immediately press candy eyeballs into the top of the brownies.
- Cool completely in the pan for at least 2 hours before slicing into squares.