Introduction |
Did you know that most people believe raw cookie dough is dangerous solely because of the eggs, but the flour can actually carry bacteria too? This surprising fact is why we use heat-treated flour in this recipe, ensuring your treats are completely safe for everyone to enjoy without any worries.
My obsession with this flavor profile started years ago at a tiny, neon-lit creamery in a coastal town in Maine. I remember the salty sea air mixing with the smell of toasted sugar as I took my first bite of a massive sandwich that tasted like a childhood dream come true.
I want you to feel completely confident in your kitchen, even if you have never baked a single batch of cookies before. We are going to walk through this together, and I promise that your home will smell like a professional bakery we finish.
- ●The contrast between the cold ice cream and the chewy cookie is absolutely divine.
- ●You get three textures in one: baked cookies, creamy ice cream, and soft, raw-style dough.
- ●These are perfect for meal-prepping and storing in the freezer for quick treats.
- ●The heat-treated flour makes the dough safe for kids and adults alike.
- ●It is an impressive showstopper dessert that is surprisingly simple to assemble.
Essential Ingredients |
Heat-Treated All-Purpose Flour provides the necessary structure for the cookies and dough; heating it first neutralizes bacteria and prevents the raw dough from tasting too “starchy.”
Unsalted Butter creates a rich, creamy mouthfeel and allows us to control the salt levels perfectly to balance the sweetness of the chocolate.
Brown Sugar adds a deep, molasses-like flavor and ensures the baked cookies remain soft and chewy rather than crisp.
Vanilla Extract acts as a flavor enhancer, rounding out the sharpness of the sugar and bringing out the natural creaminess of the ice cream.
Semi-Sweet Chocolate Chips provide bursts of intense cocoa flavor and a satisfying snap that cuts through the softness of the dough.
Vanilla Bean Ice Cream serves as the cooling centerpiece, providing a neutral, creamy base that highlights the cookie flavors.
 Let’s Make it Together |
- First things first, let’s heat that flour in the microwave in 30-second bursts until it reaches 160°F, then let it cool down completely so it doesn’t melt your butter.
- Now, go ahead and cream your softened butter with the brown and white sugars until it looks fluffy and light, almost like a cloud.
- Beat in your egg and vanilla extract slowly, making sure everything is well combined before you start adding your cooled, treated flour.
- Stir in those chocolate chips a spatula, and then divide your dough into two equal portions—one for baking and one for the “raw” filling.
- Scoop the baking portion into rounds on a tray and bake them at 350°F for about 10 minutes, then let them cool totally so they don’t melt our ice cream.
- Grab your softened ice cream and scoop a generous dollop onto a cooled cookie, then press a small piece of the raw dough right into the center of the ice cream.
- Gently place a second baked cookie on top and press down lightly until the sandwich is snug and secure.
Never use melted butter for the cookies as it will make them spread too much and lose their shape.
Ensure your cookies are completely cold before assembling, or you will have a melted mess on your hands.
Avoid overmixing the dough after adding flour to prevent the cookies from becoming tough and bread-like.
Use a high-quality vanilla bean ice cream for the best visual appeal with those tiny black seeds.
Always wrap each sandwich individually in parchment paper to prevent them from sticking together in the freezer.
Perfecting the Cooking Process |
Timing is everything when it comes to the cookies. You want to pull them out of the oven when the edges are just barely golden but the centers still look slightly underdone. This ensures that they stay soft enough to bite through without the ice cream sliding out of the sides.
Temperature control for the ice cream is the secret weapon here. Let your ice cream sit on the counter for about five minutes before scooping; it should be pliable enough to spread but not so soft that it loses its volume. Have you ever noticed how hard it is to scoop rock-solid ice cream without breaking the cookie?
Add Your Touch |
If you want to change things up, try swapping the semi-sweet chips for white chocolate and macadamia nuts for a tropical twist. You could also swirl a bit of salted caramel into the ice cream layer to add a layer of sophisticated saltiness to the sweetness.
Do you want a little more crunch? Try rolling the edges of the finished sandwiches in mini chocolate chips or crushed pecans before the final freeze. This adds a professional, gourmet look to your treats that will impress any guest.
Storing & Reheating |
For the best results, store these sandwiches in the freezer for up to three months. Wrap each one tightly in plastic wrap and then place them all inside a heavy-duty freezer bag to prevent freezer burn, which can ruin the creamy texture of the ice cream.
Do not attempt to reheat these in a microwave, as the ice cream will disappear instantly. Instead, let a sandwich sit at room temperature for 5 to 10 minutes before eating; this softens the cookie and the dough just enough for the perfect bite.
1Use a cookie scoop for the baked portions to ensure every single sandwich is the exact same size.
2Sift your heat-treated flour to remove any clumps that may have formed during the heating process.
3Freeze your baking sheets for ten minutes before scooping dough onto them to prevent the cookies from spreading.
4Add a pinch of flaky sea salt on top of the ice cream before closing the sandwich for a balanced flavor.
5Press the cookies firmly but gently to avoid squeezing all the ice cream out the sides.
FAQ |
- ●Q: How do I heat-treat flour safely?A: Place your flour in a microwave-safe bowl and heat in 30-second intervals, stirring in between, until the flour reaches an internal temperature of 160°F. This process kills any potential bacteria and makes it safe for raw consumption in the dough filling.
- ●Q: Can I use a different type of ice cream?A: Absolutely! While vanilla is the classic choice, mint chocolate chip or strawberry ice cream works wonderfully. Just ensure the ice cream is thick and creamy so it supports the weight of the cookies and the dough filling.
- ●Q: Why are my cookies too flat?A: This usually happens if the butter was too melted or if the oven temperature was too low. Make sure your butter is room temperature (softened, not liquid) and that your oven is fully preheated to 350°F before baking.
- ●Q: Can I make these without a mixer?A: Yes, you can certainly use a sturdy whisk or a hand spatula to cream the butter and sugar. It will take a bit more elbow grease to get the mixture fluffy, but the final result will still be delicious.
The Ultimate Chocolate Chip Cookie Dough Ice Cream Sandwiches
- Prep Time: 30 minutes
- Cook Time: 12 minutes
- Total Time: 42 minutes
- Yield: 12 sandwiches 1x
- Category: Dessert
- Method: Baking and Assembly
- Cuisine: American
Description
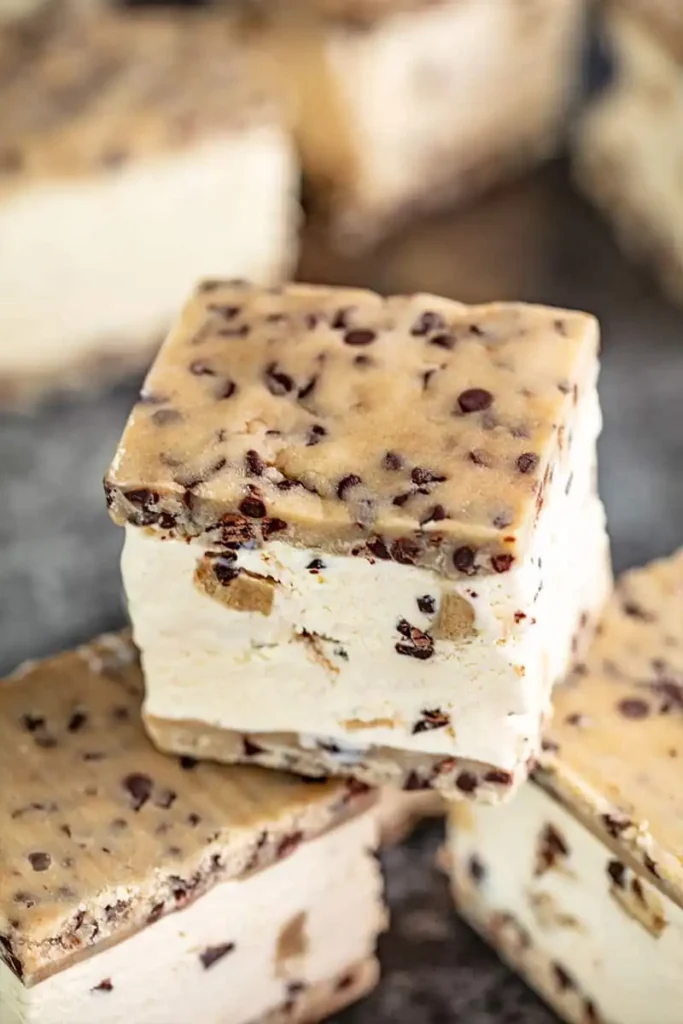
A decadent dessert sandwich featuring baked chocolate chip cookies, creamy vanilla ice cream, and a core of safe, heat-treated raw cookie dough.
Ingredients
- 2 cups heat-treated all-purpose flour
- 1 cup unsalted butter, softened
- 3/4 cup brown sugar
- 1/2 cup granulated sugar
- 1 large egg
- 2 tsp vanilla extract
- 1.5 cups semi-sweet chocolate chips
- 1 quart vanilla bean ice cream, softened
Instructions
- Heat flour in microwave until it reaches 160°F and cool completely.
- Cream softened butter with brown and white sugars until fluffy.
- Mix in egg and vanilla extract.
- Stir in chocolate chips and divide dough into two equal halves.
- Scoop one half of dough onto baking sheets and bake at 350°F for 10-12 minutes.
- Allow cookies to cool completely.
- Place a scoop of softened ice cream on a cooled cookie.
- Press a small piece of raw dough into the ice cream center.
- Top with another cookie and press gently to seal.
- Freeze for 2 hours before serving.