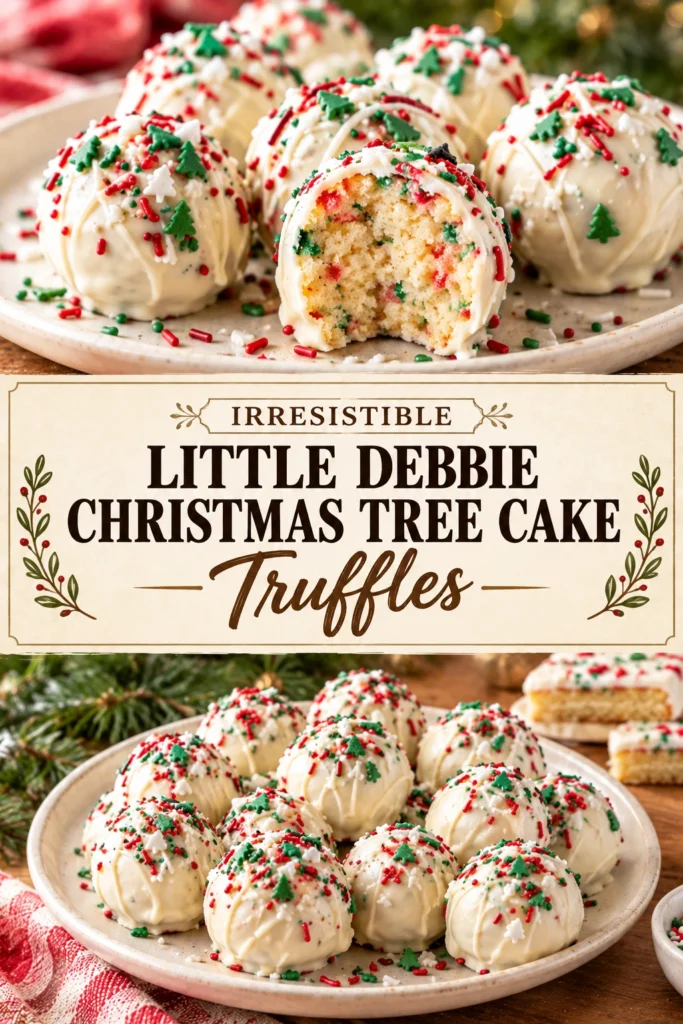
Finding a dessert that balances nostalgia with a gourmet feel can be a challenge during the hectic holiday season. These truffles offer a way to elevate a classic snack into a sophisticated party platter centerpiece.
These treats take the iconic Little Debbie Christmas Tree Cakes and transform them into rich, creamy bonbons. The result is a dense, fudge-like center coated in a smooth chocolate shell.
Home cooks appreciate these because they require no actual baking, making them a low-stress addition to a dessert table. The combination of vanilla cake and cream cheese frosting creates a flavor profile similar to a cheesecake truffle.
Unlike the original cakes, which are light and airy, these truffles are concentrated bursts of sweetness. They provide a more indulgent texture that holds up better on a platter for several hours.
Anyone from a busy parent to a holiday host will find these useful for festive gatherings. They pair well with other themed sweets like Irresistible Christmas Cutout Cookies For Festive Joy Easy Holiday Cookie Recipes
Prepare your ingredients and a few baking sheets to get started with these festive bites.
- ●Why You’ll Love This Recipe
- ●A Brief Background on Why This Recipe Works
- ●Perfect For Holiday Parties and Gift Trays
- ●Main Ingredient Spotlight: Little Debbie Christmas Tree Cakes
- ●Secondary Ingredient Spotlight: Cream Cheese
- ●Key Ingredients
- ●How to Make It
- ●Pro Tips
- ●Delicious Variations
- ●Best Ways to Serve
- ●Storage and Leftovers
- ●Frequently Asked Questions
- ●Why This Recipe Belongs in Your Weekly Rotation
- ●Final Thoughts
These truffles offer a high-impact result with very little effort, which is essential when managing a full holiday menu.
- ●No oven time is required for the assembly.
- ●The preparation time is minimal compared to traditional truffle making.
- ●They use readily available store-bought ingredients.
- ●The texture is a perfect blend of cake and fudge.
- ●They look professional and polished when plated.
- ●Children can help with the rolling and dipping process.
- ●The flavor is a nostalgic nod to childhood holiday snacks.
- ●They are highly customizable with different toppings.
- ●The recipe is scalable for large crowds.
- ●They maintain their shape well at room temperature.
This approach to holiday baking allows you to focus on the presentation rather than the stress of the oven.
A Brief Background on Why This Recipe Works |
The success of this recipe relies on the structural integrity of the pre-made cake. Little Debbie cakes already contain the necessary sugars and fats to bind together when crumbled and mixed with a creamy element.
Adding cream cheese provides a necessary tang that cuts through the sugar of the cake and the chocolate coating. This balance prevents the truffle from tasting overly sweet or one-dimensional.
The chilling process allows the fats in the cream cheese and cake to stabilize, ensuring the balls don’t flatten or melt during the dipping phase. This creates a clean, round shape that looks intentional and elegant.
Combining these elements results in a dessert that mirrors the quality of a high-end confectionery while using simple pantry staples.
Perfect For Holiday Parties and Gift Trays |
These truffles are an excellent choice for busy holiday weekends when oven space is at a premium. Since they are no-bake, you can produce dozens of them without competing with your roast or other baked goods.
For those who enjoy meal prepping their desserts, these can be made days in advance and kept in the freezer. This makes them ideal for last-minute guests or as part of a curated gift box.
Family gatherings benefit from the interactive nature of these treats. They serve as a great activity for kids to assist in the kitchen, creating a shared holiday tradition.
Main Ingredient Spotlight: Little Debbie Christmas Tree Cakes |
The Little Debbie Christmas Tree Cakes provide the foundation for both flavor and texture. Their specific vanilla sponge is designed to be moist, which prevents the truffles from becoming too dry after being processed.
Because these cakes already include a layer of frosting, they contribute an integrated sweetness that blends seamlessly with the added cream cheese. This eliminates the need for adding extra powdered sugar to the center mixture.
Secondary Ingredient Spotlight: Cream Cheese |
Cream cheese acts as the binding agent that transforms cake crumbs into a moldable dough. It provides the creamy consistency required to roll the mixture into smooth spheres.
Beyond texture, the slight acidity of the cream cheese balances the richness of the chocolate coating. This ensures that each bite is refreshing rather than cloying.
Using a full-fat block of cream cheese is important here, as low-fat versions contain more water, which can make the truffle center too soft to hold its shape.
Key Ingredients |
Each component plays a specific role in creating the final texture and taste of the bonbon.
- ●Little Debbie Christmas Tree Cakes — provides the base cake flavor and moisture.
- ●Cream Cheese — binds the crumbs together and adds a tangy richness.
- ●White Chocolate Melts — creates a sweet, creamy outer shell.
- ●Green Candy Melts — provides the festive color for drizzling or dipping.
- ●Holiday Sprinkles — adds visual texture and a festive finish.
How to Make It |
Follow these steps carefully to ensure a smooth coating and a stable center.
- Crumble the cakes: To ensure an even texture, break the Christmas Tree Cakes into small pieces and place them in a food processor. Pulse until the cakes are fine crumbs with no large chunks remaining.
- Mix in the binder: To achieve a dough-like consistency, beat the softened cream cheese until smooth, then stir in the cake crumbs. Mix until the color is uniform and the dough can be easily squeezed into a ball without sticking to your hands.
- Shape the truffles: To maintain consistent sizing, scoop about one tablespoon of the mixture and roll it between your palms. Form smooth spheres and place them on a parchment-lined baking sheet.
- Chill the balls: To prevent the centers from melting when they hit the warm chocolate, freeze the balls for at least 15 to 30 minutes. They should be firm to the touch before proceeding.
- Prepare the coating: To avoid seizing the chocolate, melt the white chocolate melts in 30-second intervals in the microwave, stirring between each session. Ensure the chocolate is smooth and glossy.
- Dip the truffles: To get a clean finish, use a fork to lower each chilled ball into the melted chocolate. Lift it out and tap the fork gently on the side of the bowl to remove excess chocolate before placing it back on the parchment.
- Decorate and set: To add the final festive touch, drizzle melted green chocolate over the top and add sprinkles immediately. Let them set at room temperature or in the fridge until the shell is hard.
1Use these techniques to elevate the quality of your truffles and avoid common pitfalls.
- ●2Softened Cream Cheese: Ensure the cream cheese is truly room temperature to avoid lumps in the cake mixture.
- ●3Avoid Over-mixing: Stir the cake crumbs into the cheese just until combined to prevent the mixture from becoming too oily.
- ●4Tempering the Chocolate: If the chocolate is too hot, it will melt the truffle center; if too cold, it will be too thick to dip. Aim for a fluid, ribbon-like consistency.
- ●5Parchment Paper: Always use parchment or silicone mats, as these truffles can stick to foil or bare plates.
- ●6Uniform Sizing: Use a small cookie scoop to ensure every truffle is the same size for a professional appearance.
Delicious Variations |
You can adapt this recipe to suit different tastes or other holiday themes.
- ●Dark Chocolate Shell: Swap white chocolate for dark chocolate to create a more bitter contrast to the sweet center.
- ●Peppermint Twist: Stir a pinch of crushed candy canes into the cake mixture for a minty flavor.
- ●Raspberry Core: Place a tiny piece of dried raspberry in the center of each ball before rolling.
- ●White Chocolate Drizzle: Reverse the colors green chocolate and drizzling with white.
- ●Coconut Coating: Roll the chilled balls in shredded coconut before dipping them in chocolate for added texture.
These changes allow you to create a variety of treats for a dessert platter, similar to how you might pair Incredible Irresistible No Bake Christmas Mini Cheesecakes Recipe Ultimate Comfort Food Classic with other sweets.
Best Ways to Serve |
Presentation is key for holiday desserts, and these truffles are highly versatile for plating.
- ●Arrange them on a tiered dessert stand with alternating colors.
- ●Place them in mini cupcake liners for a clean, individual serving look.
- ●Create a “Christmas Tree” shape on a large platter truffles in a triangle.
- ●Serve them alongside a cup of hot cocoa or a glass of sparkling cider.
For a more formal event, place a single truffle on a gold-foiled platter. The contrast between the bright green and white chocolate looks striking against a metallic background.
If serving as part of a larger spread, keep them chilled until about 30 minutes before serving. This allows them to soften slightly, which improves the mouthfeel of the center.
Storage and Leftovers |
Refrigerating
Keep the truffles in an airtight container in the refrigerator for up to 7 days. This keeps the cream cheese center fresh and the chocolate shell crisp.
Reheating
Do not reheat these truffles, as the chocolate will melt and the cream cheese will soften. Allow them to come to room temperature naturally for 15 minutes before eating.
Freezing
Store the truffles in a freezer-safe container for up to 3 months. Thaw them in the refrigerator overnight to maintain the structural integrity of the chocolate shell.
Frequently Asked Questions |
- ●Q: Can I use a different brand of snack cake for this recipe?A: While the Little Debbie Christmas Tree Cakes are the intended base, any similar vanilla-flavored snack cake with frosting will work. However, ensure the cake is not too moist, or you may need to add a tablespoon of powdered sugar to help the mixture bind.
- ●Q: Why is my chocolate coating cracking after it sets?A: Cracking usually happens when the truffles are moved from a very cold freezer to a very warm room too quickly. To prevent this, let the truffles sit in the refrigerator for an hour before bringing them to room temperature.
- ●Q: How do I stop the truffles from sticking to my hands while rolling?A: If the mixture feels too sticky, chill the dough in the fridge for 20 minutes before rolling. You can also lightly grease your palms with a tiny amount of butter or a spray of non-stick cooking oil.
- ●Q: Can I make these without using a food processor?A: Yes, you can crumble the cakes use a fork to mash them into very fine crumbs. It takes more effort to get a smooth texture, but the end result will be the same as long as there are no large chunks.
- ●Q: What can I use if I don’t have candy melts?A: You can use high-quality baking chocolate and stir in a drop of gel food coloring. Be careful not to add liquid coloring, as this can cause the chocolate to seize and become clumpy.
- ●Q: Will these truffles melt if left on a dessert table for a few hours?A: Because they contain cream cheese, they are more stable than pure ganache truffles. However, if the room is very warm, they may soften. Keeping them on a chilled platter or serving them in small batches is the best approach.
Why This Recipe Belongs in Your Weekly Rotation |
Integrating no-bake treats into your routine reduces the stress of dessert preparation throughout the year. While these are holiday-themed, the technique of using snack cakes and cream cheese can be adapted for any season.
These truffles provide a way to serve a gourmet-style dessert without spending hours in the kitchen. They offer a consistent result every time, making them reliable for hosting guests or providing treats for a school event.
Final Thoughts |
These truffles combine the joy of a classic snack cake with the elegance of a handmade confection. They are a simple, no-bake solution for anyone needing a festive and delicious treat.
The minimal effort required, paired with the impressive visual appeal, makes this a smart choice for any holiday host. They offer a rich, creamy flavor that appeals to both children and adults.
Bring a touch of nostalgic holiday magic to your table a batch of these irresistible bites today.

Irresistible Little Debbie Christmas Tree Cake Truffles
- Prep Time: 40 minutes
- Cook Time: 0 minutes
- Total Time: 40 minutes
- Yield: 24 truffles 1x
- Category: Dessert
- Method: No-Bake
- Cuisine: American
Description
A festive, no-bake dessert that transforms Little Debbie Christmas Tree Cakes into rich, cream-cheese centered truffles coated in white and green chocolate.
Ingredients
- 1 package Little Debbie Christmas Tree Cakes (approx. 12 cakes)
- 8 oz cream cheese, softened to room temperature
- 12 oz white chocolate melts
- 8 oz green candy melts
- 1/4 cup festive holiday sprinkles
Instructions
- Place Christmas Tree Cakes in a food processor and pulse until they become fine crumbs.
- In a medium mixing bowl, beat the softened cream cheese until smooth.
- Fold the cake crumbs into the cream cheese until a thick, uniform dough forms.
- Roll the mixture into 1-inch balls and place them on a parchment-lined baking sheet.
- Freeze the balls for 20-30 minutes until firm.
- Melt white chocolate melts in the microwave in 30-second intervals, stirring until smooth.
- Using a fork, dip each chilled ball into the white chocolate, tapping off the excess.
- Melt green candy melts and drizzle them over the set white chocolate truffles.
- Immediately add holiday sprinkles to the wet chocolate.
- Refrigerate for 15 minutes to fully set the shells before serving.