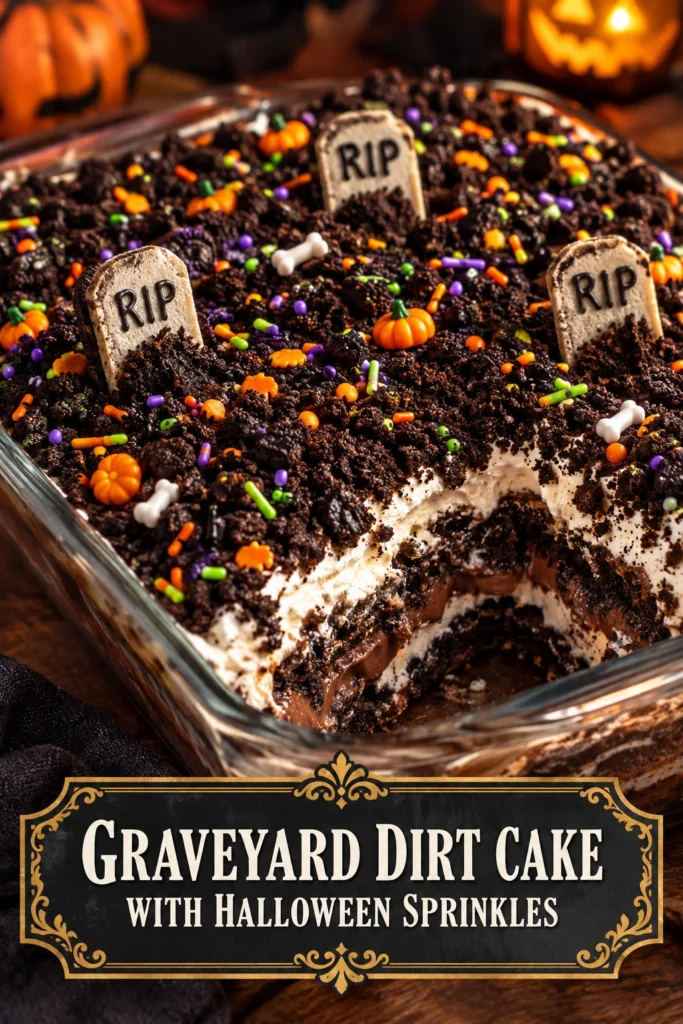
A cool, creamy mousse layer topped with a gritty, chocolate crumble creates a satisfying contrast in every spoonful.
This graveyard dirt cake is a no-bake dessert that mimics the appearance of a haunted cemetery using crushed cookies and pudding.
People love it because it combines a rich chocolate flavor with a playful presentation that fits any October celebration.
The addition of Halloween sprinkles adds a pop of color and a slight crunch that separates this version from standard dirt cakes.
Unlike store-bought puddings or pre-made cakes, this version allows you to control the sweetness and the density of the cream layer.
It is a great choice for parents who want a kid-friendly activity or hosts who need a high-impact dessert with minimal effort.
The following guide explains how to build the layers and decorate the scene.
- ●Why You’ll Love This Recipe
- ●A Brief Background / Why This Recipe Works
- ●Perfect For Halloween Parties and Family Gatherings
- ●Main Ingredient Spotlight: Chocolate Sandwich Cookies
- ●Secondary Ingredient Spotlight: Cream Cheese
- ●Key Ingredients
- ●How to Make It
- ●Pro Tips
- ●Delicious Variations
- ●Best Ways to Serve
- ●Storage and Leftovers
- ●Frequently Asked Questions
- ●Why This Recipe Belongs in Your Weekly Rotation
- ●Final Thoughts
This dessert manages to be both visually impressive and incredibly simple to put together.
- ●No oven is required for the entire assembly process.
- ●The texture is a mix of smooth cream and crunchy cookie bits.
- ●It uses common pantry staples that are easy to find.
- ●The assembly is customizable based on your decorating skills.
- ●It serves a large group of people from a single dish.
- ●The flavor profile is a classic chocolate-vanilla combination.
- ●Preparation can be done a day in advance.
- ●The colorful sprinkles make it visually stimulating for children.
It is a reliable crowd-pleaser that balances a rich taste with a whimsical theme.
A Brief Background / Why This Recipe Works |
Dirt cake relies on the structural integrity of crushed chocolate cookies to create a “soil” effect. When combined with a stabilized cream layer, the cookies stay distinct rather than turning into a paste.
The use of cream cheese in the filling provides a slight tang that cuts through the sugar of the pudding and cookies. This balance prevents the dessert from feeling overly cloying.
The layering technique allows the flavors to meld during the chilling process, creating a cohesive dessert that holds its shape when scooped.
Because it is served chilled, it acts as a refreshing end to a heavy meal.
Perfect For Halloween Parties and Family Gatherings |
This recipe is ideal for busy holiday schedules because the heavy lifting is done . You can mix the components quickly and let them set while you focus on other decorations.
For family dinners, it serves as an interactive dessert where kids can help place the “gravestones” and sprinkle the toppings.
It also works well for meal prep since it stays fresh for several days, meaning you can have your party centerpiece ready before the guests even arrive. If you are planning a full menu, this pairs well with Mummy Pancakes With Halloween Sprinkles Easy Halloween Breakfast Ideas for a themed day of eating.
Main Ingredient Spotlight: Chocolate Sandwich Cookies |
Chocolate sandwich cookies provide the essential “dirt” texture. The dark cocoa flavor offers a deep bitterness that contrasts with the sweet cream filling. When crushed, these cookies create various sizes of crumbs, from fine powder to larger chunks, which adds visual realism to the graveyard theme.
Secondary Ingredient Spotlight: Cream Cheese |
Cream cheese acts as the stabilizer for the mousse layer. It adds a dense, velvety consistency that prevents the pudding from becoming too runny.
Beyond texture, the acidity of the cheese brightens the overall flavor profile. It transforms a simple pudding mix into a rich, cheesecake-like filling that feels more substantial.
Key Ingredients |
Each component plays a specific role in achieving the final look and taste.
- ●Chocolate Sandwich Cookies — used for both the base and the top soil layer.
- ●Instant Chocolate Pudding Mix — provides the primary sweetness and flavor for the filling.
- ●Cold Milk — hydrates the pudding and creates the smooth consistency.
- ●Cream Cheese — adds stability and a tangy richness to the mousse.
- ●Whipped Topping — lightens the filling and adds airiness.
- ●Halloween Sprinkles — adds festive color and a bit of extra crunch.
- ●Gummy Worms — creates the illusion of creatures crawling through the dirt.
How to Make It |
Follow these steps to build your graveyard dessert from the bottom up.
- Crush the cookies: Place the chocolate sandwich cookies in a sealed bag and crush them with a rolling pin. Aim for a mix of fine crumbs and small pebbles to make the soil look natural. Over-processing them into a fine powder will make the topping look like cocoa powder rather than dirt.
- Prepare the pudding: Whisk the instant pudding mix with cold milk until the powder is fully dissolved and the mixture begins to thicken. Avoid over-mixing, as this can introduce too many air bubbles and change the density of the base.
- Cream the cheese: Beat the softened cream cheese in a separate bowl until it is completely smooth. If the cheese is too cold, it will leave small lumps in the mousse that disrupt the velvety texture.
- Combine the filling: Fold the prepared pudding into the creamed cheese, then gently stir in the whipped topping. Use a folding motion rather than a vigorous stir to keep the mixture light and fluffy.
- Layer the base: Spread a thin layer of crushed cookies at the bottom of your serving dish. This prevents the pudding from sliding and gives every scoop a bit of crunch at the end.
- Add the mousse: Pour the cream mixture over the cookie base and smooth the top with a spatula. Ensure the layer is even so the toppings stay in place.
- Top with soil: Cover the entire surface with the remaining crushed cookies. Press them down lightly so they adhere to the cream layer.
- Decorate the scene: Press rectangular cookies or chocolate bars into the soil to serve as gravestones. Scatter Halloween sprinkles and gummy worms around the surface for the final spooky effect.
1Small adjustments can significantly improve the final presentation and taste.
- ●2Softened Cheese: Leave the cream cheese on the counter for two hours before mixing to ensure a lump-free filling.
- ●3Chill Thoroughly: Let the cake set for at least four hours. This allows the cookie crumbs to soften slightly and the flavors to merge.
- ●4Avoid Soggy Cookies: If you are making this more than 24 hours in advance, add the cookie topping just before serving to maintain the crunch.
- ●5Custom Containers: Use individual clear plastic cups for a portable version of this dessert.
- ●6Sifting Sprinkles: Mix the sprinkles into the cookie crumbs before topping the cake for a more integrated look.
Delicious Variations |
You can adapt this recipe to fit different tastes or dietary preferences.
- ●Peanut Butter Twist: Swirl a few tablespoons of melted peanut butter into the mousse layer.
- ●White Chocolate Base: Use white chocolate pudding and vanilla wafers for a “sand” effect instead of dirt.
- ●Fruit Addition: Add a layer of fresh raspberries or sliced bananas between the cookie and cream layers.
- ●Dairy-Free Option: Substitute coconut milk and a vegan cream substitute for the traditional dairy products.
- ●Extra Richness: Fold in mini chocolate chips to the pudding mixture for added texture.
These changes allow you to repurpose the basic method for different holidays or flavor cravings.
Best Ways to Serve |
Presentation is a major part of the appeal for this specific dessert.
- ●Serve in a large glass trifle bowl to show off the distinct layers.
- ●Use small silver spoons for a contrast against the dark chocolate soil.
- ●Place the dish on a themed tablecloth with orange and black accents.
- ●Pair it with a warm beverage to balance the cold temperature of the cake.
For a coordinated party spread, consider serving this alongside Pumpkin Fudge With Halloween Sprinkles Easy Fall Dessert Recipe for a variety of textures.
If serving a crowd, pre-scoop the cake into small bowls and garnish them individually to avoid the dessert looking messy after several people have served themselves.
Storage and Leftovers |
Refrigerating
Store the cake in an airtight container in the fridge for up to 5 days. Keep it covered to prevent the cream cheese layer from absorbing other smells from the refrigerator.
Reheating
This dessert is intended to be eaten cold and should not be reheated. Heating the cream cheese and whipped topping will cause the structure to collapse and the pudding to separate.
Freezing
You can freeze the base mousse for up to 2 weeks, but do not freeze the cookie topping. Thaw the mousse in the fridge overnight and add fresh cookie crumbs and sprinkles before serving to restore the texture.
Frequently Asked Questions |
- ●Q: Can I use a different type of cookie instead of chocolate sandwich cookies?A: You can use any dark-colored cookie, such as chocolate wafers or crushed brownies. The goal is to maintain the dark brown color and a gritty texture, so avoid cookies that are too light in color or too soft.
- ●Q: How do I keep the gravestones from sinking into the pudding?A: Ensure you have a thick enough layer of crushed cookies on top of the mousse before inserting the gravestones. The cookie layer acts as a structural platform that supports the weight of the decorations.
- ●Q: Is this dessert safe for people who don’t like very sweet treats?A: The cream cheese adds a necessary tang that balances the sugar. To further reduce sweetness, you can use a dark chocolate pudding mix or add a pinch of salt to the cookie crumbs.
- ●Q: Can I make this without using an instant pudding mix?A: Yes, you can make a homemade chocolate custard on the stove. Allow the custard to cool completely before folding it into the cream cheese and whipped topping to avoid melting the fats.
- ●Q: What are the best alternatives for gummy worms?A: If you prefer something else, use candied cherries for “blood’ drops or small pieces of dried apricot to look like buried treasure. Some people also use plastic spiders for a more traditional spooky look.
Why This Recipe Belongs in Your Weekly Rotation |
While it is themed for Halloween, the core components are a classic chocolate mousse and cookie crumble that appeal to people year-round. It provides a way to satisfy a dessert craving without spending hours in the kitchen or dealing with the stress of baking.
The versatility of the recipe means it can be scaled down for a small family treat or scaled up for a neighborhood event. It is a low-stress way to bring a sense of creativity to the table.
Final Thoughts |
This graveyard dirt cake combines a rich, velvety cream filling with a crunchy chocolate crumble and festive decorations. It is a simple, no-bake assembly that looks complex but requires only basic kitchen tools.
You should make this recipe because it allows you to provide a professional-looking party dessert while keeping your prep time minimal. It is a great way to involve children in the kitchen during the autumn season.
Get your mixing bowl ready and create a spooky masterpiece that your guests will love.

Graveyard Dirt Cake with Halloween Sprinkles
- Prep Time: 20 minutes
- Cook Time: 0 minutes
- Total Time: 20 minutes
- Yield: 10 servings 1x
- Category: Dessert
- Method: No-Bake
- Cuisine: American
Description
A festive, no-bake chocolate dessert featuring layers of crushed cookies and a rich cream cheese pudding mousse, decorated to look like a haunted cemetery.
Ingredients
- 24 oz chocolate sandwich cookies
- 1 package (3.4 oz) instant chocolate pudding mix
- 3 cups cold milk
- 8 oz cream cheese, softened
- 1 tub (8 oz) whipped topping, thawed
- 1/4 cup Halloween sprinkles
- 1 package gummy worms
- 10 rectangular cookies for gravestones
Instructions
- Crush 16 oz of chocolate sandwich cookies in a bag using a rolling pin until a mix of fine and coarse crumbs remains.
- Whisk the instant chocolate pudding mix with cold milk in a bowl until thickened.
- Beat the softened cream cheese until smooth and lump-free.
- Fold the pudding into the cream cheese, then gently stir in the whipped topping until combined.
- Spread a thin layer of crushed cookies at the bottom of a glass serving dish.
- Pour the cream cheese pudding mixture over the cookie base and smooth the top.
- Cover the top with the remaining crushed cookies, pressing lightly.
- Insert rectangular cookies as gravestones and garnish with Halloween sprinkles and gummy worms.
- Refrigerate for at least 4 hours before serving.