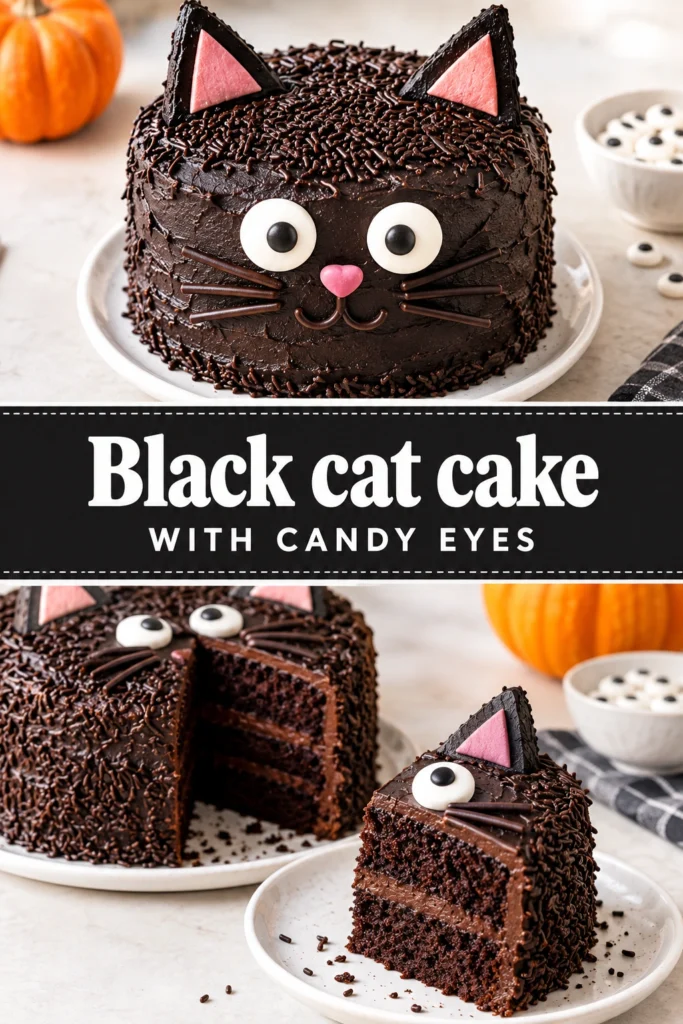
A centerpiece dessert should provide a visual impact that matches its flavor. This cake uses deep, dark tones to create a playful feline figure that captures attention immediately.
This recipe is a themed chocolate cake shaped like a cat, finished with a jet-black frosting and oversized candy eyes. It transforms a standard layer cake into a sculptural dessert.
Home cooks appreciate this recipe because it allows for creativity without requiring professional sculpting tools. The focus remains on the flavor of the chocolate and the whimsical presentation.
The distinct look comes from the use of black cocoa or dark food coloring, which creates a void-like appearance that makes the candy eyes pop.
Unlike store-bought cakes that often use overly sweet, airy frosting, this version utilizes a stable buttercream that holds the shape of the cat’s ears and head.
It is a great choice for parents hosting Halloween parties or anyone looking to move beyond standard cupcakes. If you enjoy making themed sweets, you might also like Chocolate Spiders With Candy Eyes Easy Halloween Treats For Kids
Follow these steps to assemble your own spooky feline cake.
- ●Why You’ll Love This Recipe
- ●A Brief Background on the Design
- ●Perfect For Spooky Parties and Family Gatherings
- ●Main Ingredient Spotlight: Black Cocoa
- ●Secondary Ingredient Spotlight: Buttercream Frosting
- ●Key Ingredients
- ●How to Make It
- ●Pro Tips
- ●Creative Variations
- ●Best Ways to Serve
- ●Storage and Leftovers
- ●Frequently Asked Questions
- ●Why This Recipe Belongs in Your Weekly Rotation
- ●Final Thoughts
This cake balances a bold aesthetic with a classic flavor profile that appeals to guests of all ages.
- ●The dark color palette creates a high-contrast look against the candy eyes.
- ●Chocolate cake is a universally liked flavor for parties.
- ●The shaping process is straightforward and does not require complex molds.
- ●It serves as a conversation piece on any dessert table.
- ●The buttercream is stable enough to support the cake’s structure.
- ●You can adjust the darkness of the cake based on your cocoa preference.
- ●It pairs well with other spooky treats like Irresistible Black Velvet Halloween Cake Recipe To Impress Spooky Dessert Idea
- ●The candy eyes add a playful element that lightens the spooky theme.
This dessert is as much about the process of decorating as it is about the final taste.
A Brief Background on the Design |
The concept of a character cake relies on simple geometric shapes. cake layers and carving small sections for the ears, a recognizable cat silhouette emerges.
The choice of black frosting is intentional. It hides imperfections in the carving process, allowing the cook to focus on the overall silhouette rather than a smooth, professional finish.
Using candy eyes instead of piping them with icing provides a 3D effect. This depth makes the cat look more alert and whimsical.
The final result is a dessert that feels custom-made but utilizes standard baking techniques.
Perfect For Spooky Parties and Family Gatherings |
This cake is ideal for October celebrations where a themed dessert is required. Its bold look fits perfectly among pumpkins and cobwebs.
For family dinners, it provides a fun activity if children help place the candy eyes or smooth the frosting. It turns dessert time into an event.
Because it is a substantial cake, it works well as the main treat for a gathering, reducing the need for multiple smaller desserts.
Main Ingredient Spotlight: Black Cocoa |
Black cocoa is the secret to the deep, dark color of this cake. Unlike regular cocoa powder, black cocoa is processed at higher temperatures, which removes the reddish-brown tint and results in a dark, oreo-like color and a more mellow flavor.
Secondary Ingredient Spotlight: Buttercream Frosting |
Buttercream provides the necessary structure to carve the cat’s shape. Its thickness allows it to fill in the gaps where the cake was trimmed, creating a seamless surface.
When mixed with black gel coloring, the buttercream becomes an opaque coat that prevents the cake layers from showing through.
Key Ingredients |
These components work together to create the flavor and the iconic black feline look.
- ●Black Cocoa Powder — Provides the deep color and a rich, chocolatey base.
- ●Unsalted Butter — Creates a smooth, creamy texture in the frosting.
- ●Powdered Sugar — Sweetens the frosting and provides the necessary stiffness.
- ●Candy Eyes — Adds the focal point of the cake with a 3D effect.
- ●Cake Flour — Keeps the crumb tender so the cake doesn’t crumble during carving.
- ●Black Gel Food Coloring — Intensifies the frosting color to a true, midnight black.
How to Make It |
Assemble your cake the structure first and the decorative details last.
- Bake the layers: Bake two round chocolate cakes using black cocoa. The cakes are done when a toothpick inserted in the center comes out clean with no wet batter. Avoid overbaking, which can make the cake dry and prone to crumbling during carving.
- Cool completely: Let the cakes cool in the pan for 10 minutes before transferring them to a wire rack. Attempting to carve a warm cake will result in jagged edges and a collapsed structure.
- Carve the cat shape: Use a serrated knife to cut a circular head and a larger oval for the body from your layers. Cut two small triangles from the scraps to create the ears. Ensure your cuts are clean to minimize excess crumbs.
- Stack and fill: Place the body piece on the platter and layer frosting between the slices. Set the head on top of the body, using a small amount of frosting to act as glue. Do not overfill the center, or the head may slide off.
- Apply the crumb coat: Spread a thin layer of black buttercream over the entire cake to seal in crumbs. Chill the cake in the fridge for 20 minutes until the frosting feels firm to the touch. This prevents black crumbs from streaking through your final layer.
- Apply the final coat: Spread a thicker layer of frosting over the cake, smoothing it with a spatula. Shape the cheeks to be slightly rounded and attach the triangle ears to the top. Avoid over-working the frosting, or it may develop small air bubbles.
- Add the candy eyes: Gently press two large candy eyes into the head area. Space them slightly apart to give the cat a curious expression. Do this last so the eyes do not shift during the frosting process.
1Small adjustments in technique can lead to a more polished final appearance.
- ●2Freeze the layers: Placing the cake layers in the freezer for 30 minutes before carving reduces crumbs significantly.
- ●3Use gel coloring: Opt for gel or paste colors rather than liquid drops to avoid thinning the frosting.
- ●4Sift the cocoa: Sifting the black cocoa powder prevents small lumps from appearing in the cake batter.
- ●5Room temperature butter: Ensure your butter is soft but not melted for a smooth, non-grainy buttercream.
- ●6Offset spatula: Use an offset spatula for the final frosting layer to get a more even surface on the curved edges.
Creative Variations |
You can adapt this recipe to fit different flavor preferences or dietary needs.
- ●White Chocolate Eyes: Melt white chocolate and pipe pupils onto white discs for custom eyes.
- ●Red Velvet Interior: Use a red velvet cake base for a surprising color contrast when sliced.
- ●Orange Cat Version: Swap black cocoa and coloring for orange food coloring to make a ginger cat.
- ●Gluten-Free Base: Substitute cake flour with a 1:1 gluten-free flour blend for guests with sensitivities.
- ●Dark Chocolate Ganache: Replace buttercream with a stiff chocolate ganache for a more intense chocolate taste.
These changes allow the cake to fit different themes while keeping the cat silhouette.
Best Ways to Serve |
Presentation enhances the experience of a themed dessert.
- ●Place the cake on a bright orange or purple platter to make the black color stand out.
- ●Surround the base with orange sprinkles or candy corn.
- ●Serve slices with a side of fresh raspberries for a pop of color.
The cake is best served at room temperature so the buttercream remains soft and the chocolate flavor is prominent.
If serving at a party, slice the cake into wedges starting from the center of the body to ensure everyone gets a piece of the decorated exterior.
Storage and Leftovers |
Refrigerating
Store the cake in an airtight container in the refrigerator for up to 5 days. The cold temperature keeps the buttercream stable and the cake moist.
Reheating
Do not reheat this cake in a microwave. Instead, let individual slices sit at room temperature for 30 to 60 minutes before eating to soften the frosting.
Freezing
You can freeze the unfrosted cake layers for up to 3 months. Wrap each layer tightly in plastic wrap and foil to prevent freezer burn.
Frequently Asked Questions |
- ●Q: How do I get the frosting to be truly black?A: Achieving a deep black requires a combination of black cocoa powder and a high-quality black gel food coloring. Start with a chocolate buttercream base, then add the gel color gradually. Let the frosting sit for an hour, as the color often deepens over time.
- ●Q: Can I make this cake without black cocoa powder?A: Yes, you can use standard unsweetened cocoa powder and add black gel food coloring to the batter. However, black cocoa provides a more natural dark hue and a specific flavor profile similar to dark chocolate cookies.
- ●Q: My cake is crumbling while I carve it; what happened?A: This usually happens if the cake is too warm or if the knife is not serrated. Ensure the cake is completely cooled or slightly chilled. Use a long serrated knife and a gentle sawing motion rather than pressing straight down.
- ●Q: What is the best way to attach the ears?A: Use a small dollop of buttercream on the bottom of the triangle cake pieces. Press them firmly onto the top of the head and use a bit of extra frosting to blend the seam where the ear meets the head.
- ●Q: Will the black frosting stain my teeth?A: Deeply colored frostings, especially those with significant gel coloring, can leave a temporary tint on the tongue and teeth. Using black cocoa helps reduce the amount of artificial dye needed, which may lessen the staining effect.
Why This Recipe Belongs in Your Weekly Rotation |
While a cat-shaped cake is a specialty item, the base chocolate cake recipe is a versatile staple. Once you master the black cocoa balance, you can use the batter for any chocolate dessert.
Incorporating themed baking into your routine encourages creativity and provides a way to celebrate small milestones or holidays with something handmade.
The ability to create a visual spectacle with simple ingredients makes this a rewarding addition to your baking repertoire.
Final Thoughts |
The Black Cat Cake with Candy Eyes combines a rich chocolate flavor with a whimsical, spooky design. the silhouette and using high-contrast colors, you create a dessert that looks complex but remains manageable for home cooks.
Making this cake allows you to experiment with shaping and decorating techniques while providing a treat that guests will remember. It is a practical way to bring a touch of Halloween spirit to the table.
Grab your mixing bowl and start crafting this playful feline dessert today.

Black Cat Cake with Candy Eyes
- Prep Time: 45 minutes
- Cook Time: 35 minutes
- Total Time: 1 hour 20 minutes
- Yield: 8 servings 1x
- Category: Dessert
- Method: Baking
- Cuisine: American
Description
A whimsical chocolate cake shaped like a black cat, featuring deep black cocoa layers and large candy eyes for a spooky effect.
Ingredients
- 2 cups cake flour
- 3/4 cup black cocoa powder
- 1 1/2 tsp baking powder
- 1/2 tsp baking soda
- 1/2 tsp salt
- 1 cup unsalted butter, softened
- 2 cups granulated sugar
- 3 large eggs
- 1 cup buttermilk
- 1 tsp vanilla extract
- 1 cup unsalted butter, softened (for frosting)
- 4 cups powdered sugar
- 1/2 cup black cocoa powder (for frosting)
- 1 tsp black gel food coloring
- 2 tbsp heavy cream
- 2 large candy eyes
Instructions
- Preheat oven to 350F and grease two 8-inch round cake pans.
- Whisk together cake flour, black cocoa, baking powder, baking soda, and salt in a bowl.
- Cream butter and sugar until light and fluffy, then beat in eggs one at a time.
- Alternately add dry ingredients and buttermilk to the butter mixture, stirring in vanilla extract.
- Divide batter equally between pans and bake for 30-35 minutes or until a toothpick comes out clean.
- Cool cakes completely on a wire rack.
- Carve the cake layers into a large oval for the body and a circle for the head, using scraps to cut two triangles for ears.
- Beat frosting butter with powdered sugar, black cocoa, gel coloring, and heavy cream until smooth.
- Stack the head on the body using buttercream as glue.
- Apply a thin crumb coat of frosting, chill for 20 minutes, then apply the final smooth layer of black buttercream.
- Attach the triangle ears to the top of the head.
- Press the candy eyes into the head to complete the cat face.